Food photography is tough to get right, but having a few good books really helps. One that has helped me most is Food Photography – From Snapshots to Great Shots by Nicole S. Young. Check out my review below, plus take part in my GIVEAWAY to WIN a free copy of this fab book! (GIVEAWAY NOW CLOSED)

When I started as a food blogger, I had NO IDEA how much food photography was going to be part of my life. I had imagined, rather naively, that I could just take a quick snap of my dinner (in the dark, with the lights on, using the built in flash), upload it to my blog (with zero editing), and that would be that! It didn’t take me long to realise that food photography is a HUGELY important part of food blogging and that I seriously needed to up my game.
And since those rather shaky beginnings I have learnt A LOT.
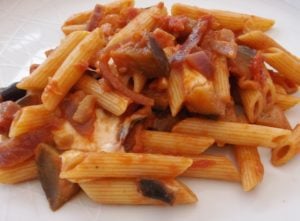
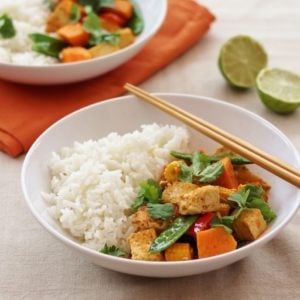
These were the sort of photographs I was taking when I started blogging…
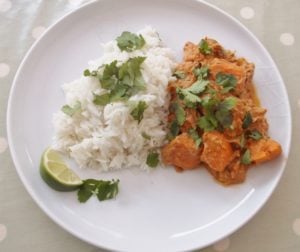

And these are the sort of photographs I am taking now…


I have really worked on my photography, by attending courses and scouring the internet for food photography tips, but probably the most helpful thing I have done is read food photography books. My favourite two by far have been From Plate to Pixel by Helene Dujardin, and this one I’m sharing with you today: Food Photography – From Snapshots to Great Shots by Nicole S. Young.

Plus, because I love you all so much, I am hosting a GIVEAWAY to WIN a copy of this fab book! Find out how to enter at the bottom of this review.
But first let me tell you all about it…
Who is Food Photography – From Snapshots to Great Shots by?
The book is written by Nicole S. Young – a full time photographer specialising in travel, landscape and photography. She also has a fab blog full of great photography tips.
What is Food Photography – From Snapshots to Great Shots all about?
This book is very comprehensive – it starts with the basics of food photography: from choosing a camera, lens and other equipment, to taking a photograph in manual mode and getting the exposure right.
She also shares her advice on lighting, food styling, composing a great shot and sharing photos on your blog and social media. There is a whole section dedicated to each of these areas.
The book has a really comprehensive section on using Adobe Lightroom. I don’t yet use Lightroom, but if and when I do, I will be coming straight to this book for tips! She shares everything from getting started with Lightroom, to organising your photos in lightroom, editing and exporting files. And, although I don’t use Lightroom, I still found quite a lot of her advice about organising and editing files really useful.

My favourite section, though, is her last chapter, which is called ‘Behind the Scenes’. In this section, Nicole shares exactly how she approaches a photo shoot from start to finish. It goes from her initial brief, through choosing props and styling, to lighting setup, actually taking the photograph and finally editing in Lightroom. I cannot state enough how valuable it is to see how a professional photographer approaches a photo shoot – and there are also loads of behind the scenes photos, which are fascinating and super useful!
Are there any special features?
Yes, at the end of each chapter Nicole sets a series of challenges related to the material you have just read. If you are the sort of person who likes putting what you have just learnt into practice, then this is perfect. It is also a great way of getting your head around the key points of the chapter.
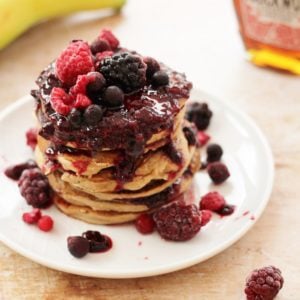
An example of one of Nicole’s challenges would be at the end of Chapter 3 – Styling and Props, where she challenges her readers to ‘make it messy’ – adding crumbs, drips, berries or seeds to a picture to make it all a bit more messy. Those who follow my blog will know I’ve been working hard on this challenge!!
For example – my Oat, Almond and Banana Pancakes…
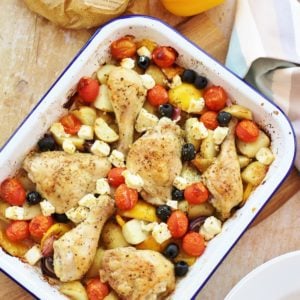
Or my Moroccan Lamb Traybake

Another great feature of this book is that every photo in the book has notes around it, about the decisions Nicole made about that shot, AND super usefully, the camera settings she chose. Here’s an example:

Who is Food Photography – From Snapshots to Great Shots for?
This book is a great book for anyone who needs to take photographs of food. It is not written specifically for Food Bloggers, but food bloggers will benefit enormously from the book.
It would also be useful for anyone who needs to take photos of food for another purpose – for example if you own a restaurant or another type of food business and need to take shots for social media or promotion, or just if you love taking snaps of your food for fun – or to share on your social media accounts, but want to take really good ones!
It is pretty much geared towards people with DSLR cameras, so if you are not looking to invest in anything more than a basic compact camera, or your phone, then this might not be the book for you. It definitely assumes you are reasonably serious about getting better at food photography and want to spend a bit of time and money on it.
Are there any negative aspects of this book?
Not really, though as I mention above, it is best suited to those with DSLR cameras or those who are looking to buy a DSLR camera in the near future.
It is quite technical, but don’t let that put you off! When I first read the book, about a year ago (when I was looking to buy my first DSLR camera ), A LOT of this book went straight over my head. I recently re-read the whole thing from cover to cover, taking notes, and so much more of the book made sense, and consequently I got a lot more out of it.
I imagine if I re-read this book again in a year’s time I will get even more out of it. I will definitely be re-reading the Lightroom chapter when I finally get round to using Lightroom!
I suppose the only other negative is that this book is not specifically written for food bloggers and therefore some of the advice is not really practical for the constraints that many food bloggers work under (very little time, small children getting in your shot, no dedicated workspace etc.), but that is only a very small negative. With an ounce of common sense you can work out how to adapt the advice from the book to your own situation.
What are the best food photography tips from the book?
I have learnt so much from this book since I bought it over a year ago, so I thought it only fair I shared just a few tips I have learnt along the way together with a few examples of where I have used that advice in my photos on Easy Peasy Foodie.
- Use a 50mm lens (or above) and a wide aperture to get that blurry background (regular readers of Easy Peasy Foodie will know what a fan I am of fuzzy backgrounds)

- Place a glass of water in the background, blurred out, to balance the shot (really handy when you haven’t got much time and want to take a quick photo – without getting out the entire contents of your fridge)
- Use smaller plates, bowls etc. than you would use in real life (sounds silly, but it actually looks so much better!)

- Use a range of different textures and textiles to add interest to the shot (I’m still not great at this one, I have a whole drawer of fabric I hardly ever use…but occasionally I get it to work!)
- Place items in the background in the corner of the shot (really handy tip, so easy to do and looks great)

- Don’t fill every nook and cranny of the shot with props – embrace the negative space (good to remind myself of when I am stressing about props and garnishes!)
- Sometimes putting the main dish in the centre of a shot is OK, especially if the scene is busy (if you know about the rule of thirds, this feels all wrong, but actually in a busy scene this really works, otherwise the focus can get lost)
- Use groups of 3 – e.g. for garnishes, crumbs, drips or even the main elements in the shot (you see this so often in foodie magazines, it really is very pleasing on the eye and, again, a really easy one to put into practice)
- Use utensils in your photos (I often forget this one, but when I do I realise how good it looks and kick myself for not doing it more!)

- Take photographs from more than one angle – eye level, three quarters and overhead (I have been doing this one for a while now and it is invaluable for providing variety in my blog posts – plus sometimes by experimenting with angles you inadvertently stumble across ‘the shot’)
This book sounds great! How can I get my hands on a copy?
Haha – funny you should ask. You can either buy a copy of Food Photography – From Snapshots to Great Shots on Amazon OR you can WIN a free copy in my GIVEAWAY!
All you have to do to enter is write a comment in the comments section at the bottom of this post and visit my Facebook page, then complete the Rafflecopter widget to say you’ve done it. If you want to, you can get extra bonus entries too! Just follow the instructions in the widget below.
Help! I’ve never used Rafflecopter before…what do I do?
Rafflecopter is a little widget that allows me to run a kind of raffle on my website, except instead of entering by buying a raffle ticket, you enter by doing things such as commenting, following me on Twitter and visiting my Facebook page.
For one entry, all you have to do is answer this simple question: What is the best food photography tip you’ve ever been given? Then for a further entry, simply visit my Facebook page.
And don’t forget to complete the Rafflecopter widget to say you’ve done these things or they won’t count!
Once you’ve done this, the Rafflecopter will unlock all the other ways you can enter, but don’t worry – you don’t have to do them all (though I’ll love you forever if you do 😀 and remember, the more entries you make, the more chance you have of winning!) When the competition closes, the little widget will work its magic and select a winning name at random. I will then contact the winner via email to arrange for the book to be sent to you.
If you have any trouble at all, please ask via the comments below and I will do my best to help you. Good luck!
The Small Print
The prize is one copy of Food Photography – From Snapshots to Great Shots, by Nicole S. Young, Second Edition, Published by PeachPit Press
There is only one prize and there will only be one winner
There is no cash alternative
The winner will be selected at random by the Rafflecopter widget
The prize can only be posted to a mainland UK address
Once the prize has been posted, Easy Peasy Foodie cannot be held responsible for any loss or damage to the parcel during transit
Entry is via the Rafflecopter widget only
The Rafflecopter giveaway will close at midnight on Wednesday 22nd March 2017
The randomly selected winner will be contacted by email within 48 hours of the giveaway closing
The winner will have 7 days to respond, otherwise a new winner will be drawn
The giveaway is free to enter
Tracy Nixon says
Try taking photos from multiple angles. Some foods like pizza look better from above, whereas foods like burgers look better from the side. Try moving around the plate and taking photos at various angles so you can pick your favorite later.
Annabel Greaves says
Make sure the food looks appetising before you shoot it
Chonnie Johnston says
Some great tips here Eb. You have come so far in such a small amount of time, real inspiration. Your images are gorgeous! I need to sort out my photography this year, I think it’s holding me back from reaching some other goals but its just such a lot of work. Like you say, never realised it would be so time consuming. Great post, Chonnie x
Mel says
I haven’t got this book, and it seems like a great addition to my collection. I’d love to win it 🙂 Best tip? OK, let’s go for the craziest. Rather than getting steam everywhere when shooting hot soup, shoot it cold but to get some steam, dip a tampon in boiling water and hide it behind the plate. Bit weird, but it works!
Claire says
I remember the tampon tip at the Foodies100 River Cottage event- still not tried it but I will be looking at your pics with interest from now on!
Renee @ Mummy Tries says
I soooo need this book! Taking photos from different angles is a great tip, it’s often not until you’ve moved a handful of times that things look just as you want them to 🙂
Rachel Craig says
Take a variety of photographs of the same subject. Vary distance, angle etc. I found that some photographs were more interesting when they were taken close-up.
Andrea Upton says
Make sure the plates are sparkling clean a fingermark will show up on the photo
Jacqui Bellefontaine says
I have the book and have started to read it. Its a good one I think but agree that some of the terminology is a bit technical, so far i have only read the basics at the beginning which i kind of know but want to check im not missing anything and i can just about follow, not sure i could if I had no knowledge. So I can see why you are gaining more from re reading.
I partly got it because I do have and use lightroom (I have installed programme not the cloud version) and I am sure that there is more I can do with the programme.
Your pics have come on so much I admire how far you have come – I at least started with years of experience as a food stylist so have only had to get to grips with the camera and editing which is hard enough.
Interesting what you have said about getting messy. I remember when messy plates, first became fashionable. Its a hard look to master as there is a fine line between it looking good and it well…. looking a mess. You are doing so well. I take my hat off to you.
Julie M says
My best tip is to never use the camera flash.
T Brailey says
I was once told to spray the food with water, especially if it is fruit.
Suzanne says
Look for interesting angles, shapes, patterns and colours.
Midge says
Love looking back and seeing how much better photos have got! I do love your photos Eb they are lovely! I think the wallpaper sample for backgrounds and making your own wooden boards is a great tip I read somewhere!
Petra says
When it comes to photography I am not really good, I just know that light is important more than anything else, more than the camera even! I stumbled upon this tip on one of the food blogs, cannot think of the name now!
Kate - gluten free alchemist says
I need this book and I need lightroom! Despite positive feedback, I always think my food photos are crap…….. My problem is definitely the technical understanding. Light always seems to be my nemesis. Oh….. and time is never on my side either!
Tips? Simply to use natural light and to bounce it back with a piece of white card.
ksenia zywczuk says
Some seafood, such as scallops take better photographed when raw
Jane Willis says
Try to arrange or angle your food so that there is a shine on it to make it look mouthwatering.
Michelle Rolfe says
I think the best tip I’ve had is to take away the last thing you’ve added to the photo! I feel into the adding more trap and realise that when I take away the last prop or item then I am happy with the shot. My photography has come on a lot in the last 2 years. I’d love to go back and retake the photos, but then again its nice to see how far i’ve come!
Danielle says
I’d love to win this book – always something new to learn. I’d suggest never give up, keep trying and learn from your mistakes
Angela / Only Crumbs Remain says
I NEED this book in my life Eb, I love my new camera and I think my pics have improved imeasurably since my early blogging days too but I know that I have sooooo much to learn too.
I think one thing I have certainly learnt is that I often get camera shake. I try to counter that either by using a tripod or (if I can’t get it in the right position for what I’m trying to capture) I might rest the camera on a multi pack of tinned beans (more stable than a single tin) or even a robust box (which often provides me with three different height to work from). I also find that although I position the shoot by the kitchen window that I’ll take a sequence of shots from the same position and there will be one that will sometimes have a caught a moment when the sunlight is landing on the food so much more nicely than the others in the sequence (that’s once the clouds have shifted!). So I think I think taking a sequence of shots helps the potential of capturing the light just right.
Great giveaway Eb 🙂
Angela x
Lorna Ledger says
I think using nail varnish (clear) as a glaze!
Hayley @ Snap Happy Bakes says
This looks like a great book! In don’t really have any tips…… try to get height in the food before taking pics…… Sorry I’ve not got much knowledge! I just point and shoot ? That probably explains my pictures!
Samantha says
I’d love to know how to photograph food, my pictures always look flat.
Shaheen says
Around lighting and how it bounces.
Louise Fairweather says
Don’t do it when you want to eat it! This is usually my problem!
Kirsty Hijacked By Twins says
The best tip I have ever had was if you have cooked at night, plate some up to take pictures of during the day, no one can see from a picture if it is hot or cold but the light makes such a difference! x
Sarah James @ Tales From The Kitchen Shed says
Sounds a great read. I like the advice for taking from as many angles as you can, my best photos have been from angles I didn’t think would work. Your photography is going from strength to strength Eb, I love your messy pancake shot. The best tip I learnt was to have some idea of what you want from the photo before you begin, make a rough sketch and have plenty of extra props just in case.
Lynn Clark says
Eb, your photos are inspiring in themselves, let alone the advice. I think your comment about buying the best you can afford is great and the recognition that starting out you’re going to have (or only be able to afford) something basic and making the most of it. I can see that you have improved massively, but what is clear is that you had the skill, they ‘eye’ (whatever it’s called) to start off with as your early shorts are definitely better than others – including my own – early photos!
I think my photography has come on a lot itself, but I’ve ruined many a chance of getting my recipes out there by my rubbish photography and your tips have helped. This book would get a lot of use in my house!
I think the tip I have used the most from early stages is to avoid artificial light. Difficult in northern Europe in the winter, and especially as I work and am out of the house during winter daylight hours. To compensate someone told me to take my food outdoors and photograph it outside if I have to turn the lights on indoors. The light quality is better, it’s more diffused, there’s less reflection and the camera copes with the scene better.
Thanks for your blog!
stephen says
Keep it simple; and use one light source
Dave Wills says
I love photography this would be a new string !
Sammie says
What a fantastic post and honest review of this book. I’m looking to buy a camera, so far all the shots on my blog are iPhone or iPad. In fact for the first year I ran my entire blog from my iPhone 4S. My top tip is always use natural light and again try different angles. I’ve actually found the photography side of being a food blogger really enjoyable, however I still have absolutely masses to learn.
Loving the new look to your website and it’s great to see how much your photography has changed, although the earlier photos are still delicious looking! X
Heather Haigh says
I’ve never been given any tips on photographing food but it’s something I really want to get better at
Solange says
Look for interesting angles and try to use natural light.
Elizabeth Smith says
To not always make the plate of food in the centre of the photo
Tee says
The best tip I was ever given was to let myself indulge in it! People can be very disparaging about people taking photos of their food, but studies show people who do actually enjoy the taste more!
Sally Collingwood says
Keep it simple and light
chris hunt says
Use some nice props to enhance your shots. Pretty plates, glasses, tablecloths and antique cutlery can add a nice feel. You can get unusual things in markets and antique shops. It does not have to be expensive. One of the nicest glasses I saw in a photo was from a pound shop.
Laura Pritchard says
To use plain plates, no crazy patterns just plain white so they don’t detract from the food.
GALINA V says
Use natural light, whenever possible.
pete c says
ensure you are familiar with your camera functions before you start!
lynn neal says
Choose the plate colour carefully so that it compliments the food on it!
Ruth Harwood says
Make sure the arrangement is just right and take mutiple pics from different angles xx
Rachel Butterworth says
Photograph the food while its still hot. It looks more appetising.
Janice says
Shoot in natural daylight.
Claire says
My pics are no where near as good as yours but I too can see an improvement since doing a couple of blogger workshops. I now look for fabric remnants and kitchenalia in charity shops – in fact it is a perfect excuse to buy retro kitchen stuff. I have loads I haven’t used yet!
I can’t get the hang of flat lays and don’t think I have an eye for them so I would say to people not to worry if they can’t follow the crowd – go and find a new angle that suits you!
aj says
to use fresh food
Sarah Ann says
This book is definitely on my wish list! I’ve been playing around with angles and I’ve learned how importaht lighting is when taking my food shots in particular.
Victoria Prince says
As a rule of thumb, don’t take photos *directly* overhead is all I can think of…I haven’t really been given any tips, which is probably why my photos are rubbish! I learnt so much from reading this post. I suppose you’ve given me loads of tips so can I count one of those?! If so it would be the one about taking lots of photos from lots of different angles
BASSAM AL-YASEEN says
Awesome.. Thanks for the chance
Claire Woods says
Having good lighting.
Sirley Young says
Use natural light as much as possible 🙂
janine atkin says
use natural light
Lisa Niblock says
Best tip was for bowls… Using tin foil or aluminium foil underneath the food to help make it shine especially for side dishes or condiments!
Kavey at Kavey Eats says
Best tip for me had been to look at the lighting and be aware of the shadows, even when you’re using natural light rather than artificial.
Samantha R says
My absolute favourite tip is to use mash potato instead of ice cream! Basically consider the impact of time and heat on the food you’re photographing, and see if there’s any realistic alternatives you can use instead.
Melanie Pennie says
Use a fairly neutral background which allows you to place maximum emphasis on the food in the scene. A neutral background doesn’t mean that it has to be completely plain, but it should complement the subject rather than suppress it.
Rebecca says
I need this book! Can it also conjure up natural light for me when the weather us being exceptionally British!!!
Meryl Thomas says
Ensure that the food is fresh and looks colourful
Rebecca Howells (@PeanutHog) says
Take with a white background or keep background plain
Mary H says
The angles you shoot from are so important, and natural light where possible.
Clare Bell says
Check what you can see in the background!
carol boffey says
a good background
Rebecca Beesley says
using natural light if possible is the best tip i try to remember. I also think a few props really help whereas before i used to only photograph the food and nothing else around it.
Nancy says
Tell a story with your picture,has been the best tip for me
Erica Price says
Take quick shots on the DSLR portrait setting
Mum Reinvented says
Use natural light and imply/create movement in the shot
Josh Gough says
Always cook cheese 20 seconds less than you think you need
Jackie Talbot says
Using flash and the angles you shoot from
Charmian Filewood says
Take from all different angles and distances as you can ever take too many pictures but you can however take too few. This them gives you an opportunity to pick out the best ones as your target audience would see them
Lyndsey Bruce says
Take a variety of shots as you never know what will jump out as the perfect shot.
Hazely says
Experiment with angles and don’t be afraid to cut off corners if necessary.
Adrian Bold says
Keep It Simple!
Take out stuff you don’t need. Take out things on the table that are distracting and pair down to just one plate of food. If the food once cooked is unattractive only show a portion of it. Brown soup doesn’t really seem visually stimulating but if you have to do something with it, get creative with props and cropping and when in doubt follow the “more is less” rule of thumb.
Zoe Graham says
look out for little details like cleaning the plate, and arranging any sides etc
Teresa sheldon says
Little is more, don’t over pile or overload the photo
chloe brill says
present the food in an interersting way
laura stewart says
i like looking on facebook
Heather Tinkler says
Just like other photos lighting is really important
Natalie Crossan says
Don’t use the flash because it can make food look a bit raw!