
All the wonderful sticky, spicy, deliciousness of a classic old-fashioned gingerbread cake… in a handy traybake form – easy to cut and perfect for sharing. Keep this Easy Gingerbread Traybake Cake traditional and leave it un-iced, or drizzle with a simple lemon icing and scatter with stem ginger for an easy peasy wow factor!
This blog post contains affiliate links, this means if you click on a link and go on to buy the product I recommend, I will get a small commission, but you will not be charged a penny more – thanks in advance!
Proper old-fashioned gingerbread cake
I am a big fan of proper old fashioned gingerbread cake – sticky and packed with plenty of ginger and other spices… and they don’t come much more traditional and old fashioned than Mary Ball Washington’s recipe from 1784. (Mary Ball Washington was George Washington’s mother, in case you didn’t know…)
I first tasted Mary Ball Washington’s fabulous recipe – warm from the oven – at the American Museum in Bath over 25 years ago… It is one of those flavours that has stuck in my mind for all the years since then… (Tell me I am not the only one to keep such long food memories?!)
Well, I actually went back to the American Museum for my 40th birthday a little while ago. Sadly they were not serving the gingerbread that time, but, while I was browsing in the gift shop, I spotted they had a cookbook for sale, and lo and behold it had Mary Ball Washington’s gingerbread cake recipe in it – hoorah! Naturally I snapped it up so I could recreate the recipe at home…

Easy Gingerbread Traybake Cake
Well, me being me, I then spent some time playing around with the recipe… I wanted to recreate the wonderful traditional flavour and texture of Mary Ball Washington’s recipe, but I also wanted to simplify the recipe to make it as easy peasy as possible to make. (If you’ve been around here for any length of time, you know I am obsessed with simplifying recipes as much as possible!)
So my version of Mary Ball Washington’s gingerbread has fewer ingredients and fewer processes, but is still packed with fabulous traditional ginger cake flavour.
I have also tweaked the recipe to make it fit a traybake pan – to make it easy peasy to cut and perfect for sharing at parties, selling at bakesales etc. And I’ve translated the quantities into metric units for us Brits. (Though if you need US customary measurements, I’ve included those too!)
So, no, this isn’t the exact Mary Ball Washington recipe for gingerbread cake – but it very much captures the essence of Mary Ball Washington’s recipe, while being simpler, quicker and in a convenient traybake format.

How to decorate gingerbread cake
Gingerbread cake is wonderful warm, fresh out of the oven (as I first had it all those years ago). It is also arguably even more delicious once cooled and wrapped up for a few days before eating.
But, un-iced, what can I say… it’s not much of a looker – it is, after all a bit of a boring brown rectangle… an utterly delicious and moreish boring brown rectangle, but a boring brown rectangle none-the-less!
And sometimes, well, you want a bit more pizzazz – a bit more drama, a bit more wow-factor… Basically, you want some kind of decoration!
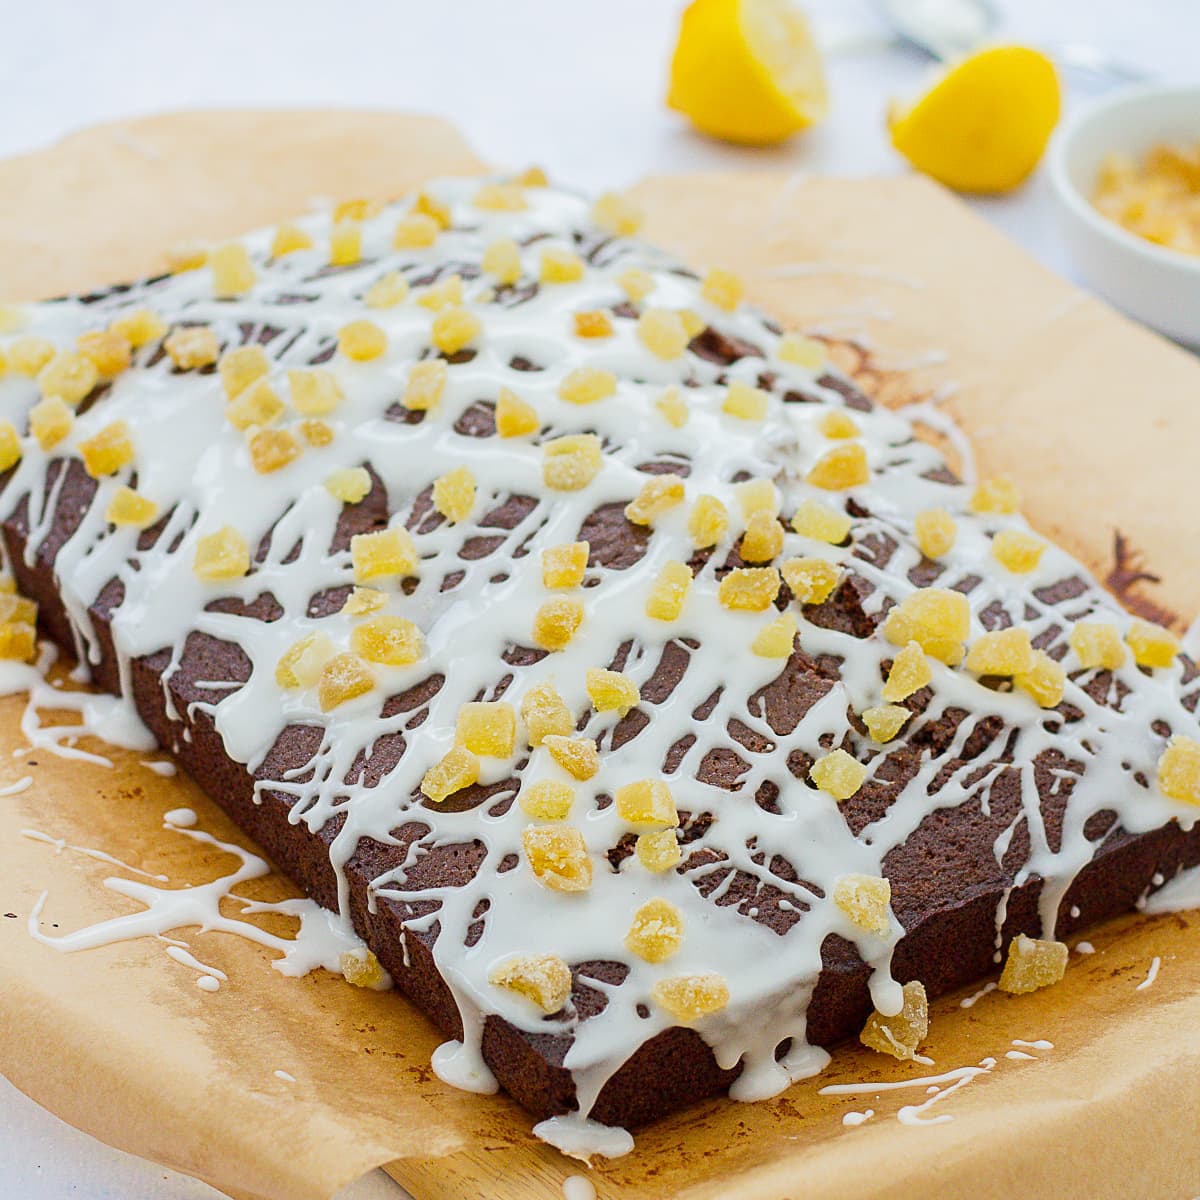
So I got my thinking cap on again and came up with this very simple, but very effective way to decorate this delicious gingerbread cake: namely, a simple lemon water icing drizzled ‘graffiti-style’ over the cake and finished with tiny pieces of stem ginger liberally scattered on top.
It’s the perfect kind of decoration for people (like me!) who aren’t all that good at cake decoration, but still want a bit of wow-factor. It’s quick, it’s simple and it takes no decoration skills whatsoever ?
(Psst: if you are struggling to find stem ginger in your local supermarket, don’t worry, it’s easy to find online. This is the one I used: Seba Garden Crystallized Ginger*)

How long will gingerbread cake keep for?
Gingerbread cake will keep for up to 2 weeks if stored correctly. Once cooled, wrap the gingerbread cake up in baking paper, then foil, and store it in an airtight corner at room temperature. Gingerbread cake actually improves with age, so if you can possibly bear it, wrap it up for a couple of days before serving.
If you decide to decorate this cake with the lemon water icing and stem ginger, it will not keep for quite so long. Place the iced cake in an airtight tin, where it will keep for up to a week.
Can you freeze gingerbread cake?
Gingerbread cake freezes very well if stored correctly. Once cooled, wrap the gingerbread cake up in baking paper, then foil, and store it in a plastic lidded container (or freezer bag) in your freezer. It will keep for up to 3 months like this.
To defrost the gingerbread cake, simply remove it from the freezer and defrost at room temperature for a few hours. You can then eat the cake as it is or decorate it once fully defrosted.
(Note: you should only freeze the un-iced cake. It will not freeze well after you have iced the cake.)

Equipment I use to make this Easy Gingerbread Traybake Cake
I use really basic equipment to make this cake (and all my cakes!) – just a couple of bowls, a wooden spoon (well actually it’s a silicone spoon!), a saucepan, a jug and a 33cm by 23cm (13ins by 9ins) cake pan.
However, I just wanted quickly share with you my super cool traybake cake pan* – it’s just like a regular cake pan, except it also comes with a lid, making it easy to transport your traybake to bakesales and parties etc. as well as keeping the cake super fresh!
I just cook and cool my cake as normal, leaving the cake on the baking paper while it’s cooling. Then, when it’s completely cool, I use the baking paper to lift the cake back into the cake pan and pop the lid on.
Even better, when you’ve finished, you can turn over the lid so it stacks and stores easily!
How to line your cake pan the easy peasy way!
I have a super easy way to quickly and easily line cake pans. Simply cut a piece of baking paper the width of your cake pan and quite a lot longer than the length. Then cut a piece of baking paper the length of your cake pan and quite a lot longer than the width.
Next, grease the base and sides of your cake pan with butter (I use an offcut of the baking paper to spread the butter). Then place one of your pre-cut pieces of baking paper across the base of your pan and up two of the sides (you should cut it long enough so it covers the base and two sides and sticks up above the sides a bit).
Grease the base of your pan again (it help the paper stick), then place the other piece of baking paper the opposite way so that it covers the base and the other two sides and sticks up above sides a bit too.
Finally grease the base and sides again, just for good measure (in theory, cake shouldn’t stick to baking paper – in practice, an extra layer of butter really does help the cake come off the paper better!)
Not only is the cake pan now beautifully lined (without any complicated maths or measuring!), but the overhanging baking paper will serve as sort of ‘handles’ to help you lift the cake out of the tin and onto the cooling rack – so no more tipping the cake up-side down and back again!

If you like this recipe…
…you might also like:

Easy Gingerbread Traybake Cake
Ingredients
Easy Gingerbread Traybake Cake
- 150 g butter
- 225 g golden syrup
- 225 g black treacle
- 500 g plain (all-purpose) flour
- 8 teaspoons ground ginger
- 3 teaspoons mixed spice (or gingerbread spice, or pumpkin spice)
- 1 teaspoon ground nutmeg
- 2 teaspoons baking soda (see Note 1)
- 175 ml milk
- 4 eggs
- 125 g dark muscovado sugar
- 2 oranges juice and zest
Decoration
- 250 g icing (confectioners) sugar
- Juice of 1 lemon
- 100 g crystalised (candied) ginger (optional)
Instructions
Easy Gingerbread Traybake Cake
- Grease and line a 33cm by 23cm (13ins by 9ins) cake pan (see tips above) and preheat your oven to 180C / 160C fan/ gas mark 4 / 350F.
- Place the butter, golden syrup and treacle in a pan. Cook over a low heat until the butter is just melted.
- Meanwhile, place the flour, ginger, mixed spice, nutmeg and baking soda in a large bowl and stir together until thoroughly combined.
- Next, whisk together the milk and eggs in a jug.
- As soon as the butter has melted, remove the pan from the heat and add the dark muscovado sugar.
- Pour the butter/sugar mixture into the bowl containing the flour and spices, and stir everything together.
- Next, pour the eggs/milk mixture into the bowl containing the flour, spices, butter etc. and stir until thoroughly combined.
- Finally stir in the juice and zest of the two oranges.
- Tip the mixture into your prepared cake pan (it should be quite runny and have little bubbles on the surface). Then pop it straight into your preheated oven.
- Cook for 40-45 minutes until a skewer inserted into the centre comes out clean. (Use a teaspoon handle if you don’t have a skewer.)
- When done, remove the cake from the oven and leave it to cool for 10 minutes in the tin,. Then lift it out onto a cooling rack, using the baking paper to help you.
- Either eat the gingerbread warm, or leave to cool completely before wrapping it up, first in a layer of baking paper, then a layer of tin foil. Wrapped like this the cake will keep for up to 2 weeks.
- Alternatively decorate the cooled cake, as per the instructions below.
Decoration
- **Do not try to decorate the cake until it is completely cold!**
- Start by cutting up the stem ginger (if using), into ½cm / ¼inch cubes.
- Next, sieve the icing sugar into a bowl and add the lemon juice slowly until you have a thick paste. It should be quite thick, but still spreadable. (If after adding all the lemon juice, your icing is still too thick, add some cold water, 1 teaspoonful at a time, until you get the desired consistency.)
- Using a tablespoon, drizzle the icing over the cake in a zigzag pattern to achieve the graffiti effect.
- Finally, scatter over the cubed stem ginger.
- Cut the cake into 24 pieces and serve.
Video
Notes
- You can use baking soda or bicarbonate of soda (they are the same thing), however don't use baking powder as this is not the same thing!
- Suitable for freezing (if un-iced).
- Nutrition information is approximate and meant as a guideline only.
Pin Easy Gingerbread Traybake Cake for later

FREE 4 Week Easy Dinners Meal Plan
Have you got your hands on a copy of my meal plan yet? If not CLICK HERE to download a copy of my FREE 4 Week Easy Dinners Meal Plan today!
Don’t want to miss a thing?
Follow me on Twitter, Facebook and Instagram. Or why not subscribe to my blog and get delicious, stress free recipes straight to your inbox every week?
Linkies
I am linking this up to Cook Blog Share.
Disclosure
*This blog post contains affiliate links, this means if you click on a link and go on to buy the product I recommend, I will get a small commission, but you will not be charged a penny more – thanks in advance!
Corina Blum says
I love sticky ginger cakes and this one sounds fantastic! I can quite easily imagine eating something 25 years ago and still remembering it and wanting to remake it too.
Choclette says
Sticky gingerbread is one of my favourites and it goes so well with lemon icing. Your traybake looks gorgeous and just perfect for warming up spirits as well as bellies on a grey November day.
Sarah James says
Your sticky gingerbread looks delicious Eb. Ginger is one of my favourite flavours in a cake, I love how you’ve added a second hit with the stem ginger scattered on top.
Midge @ Peachicks' Bakery says
oooh Love a good traybake and is there a better flavour for Autumn than gingerbread?
Eb Gargano says
Thanks, Midge. Oh I know – so wonderfully autumnal! 😀
Long says
Absolutely fabulous taste. Extremely easy to make.
I added extra powdered ginger and finely chopped ginger pieces in syrup.
Delighted with result.
Eb Gargano says
Yay! I am so happy you liked this so much. Thanks for this lovely feedback, and especially the 5* rating! Eb 🙂
Kat (The Baking Explorer) says
I would devour this, it looks so yummy!!
Eb Gargano says
Thanks, Kat! 🙂
Rebecca - Glutarama says
Well this will be a winner in my family, I can make this Bethany friendly too, may need a little extra tweaking so I can eat it but I love a challenge. I adore gingerbread and the addition of crystallised ginger for decoration is genius.
Eb Gargano says
Aw, yay! So happy to hear that. Do let me know what you do to tweak it for you and Bethany. Eb x
Janice says
I love everything gingerbread, this recipe looks simple to follow and I love how you have decorated it.
Eb Gargano says
Aw, thanks Janice! 😀
Lindsay North says
Delicious! I made small tweaks to make it vegan (plant-based butter, oat/almond milk and ‘eggs’ made with ground flax, chia seeds and water). I also didn’t have golden syrup, so made up the difference with more black treacle and the result is lovely. This will be a favourite for sure 🙂
Eb Gargano says
Hi Lindsay, Lovely to hear you enjoyed this so much and that you were able to tweak it to make it vegan! Eb 🙂