
Think tiramisù is hard to make? Think again! This delicious Easy Peasy Tiramisù looks impressive, but it’s actually super simple to make and takes just 15 minutes hands on time!

Think Tiramisù is hard to make? Think again!
Is tiramisù something you’ve always though of as hard to make and a bit fiddly? That’s not so… if you use my Easy Peasy Tiramisù recipe!
As I so often do on this website, I’ve taken a classic and simplified it… but without compromising on flavour!
In fact, I think this Easy Peasy Tiramisù is the best one I’ve ever tasted! (And I have eaten a lot of tiramisù in my life.)
Now, I’ll be the first to admit that this tiramisù is not ‘authentic’ – authentic tiramisù does not actually contain cream – the ‘cream’ in authentic tiramisù is actually a mixture of raw eggs, sugar and mascarpone cheese.
Personally, I much prefer the cream version… and it’s a lot simpler to make!

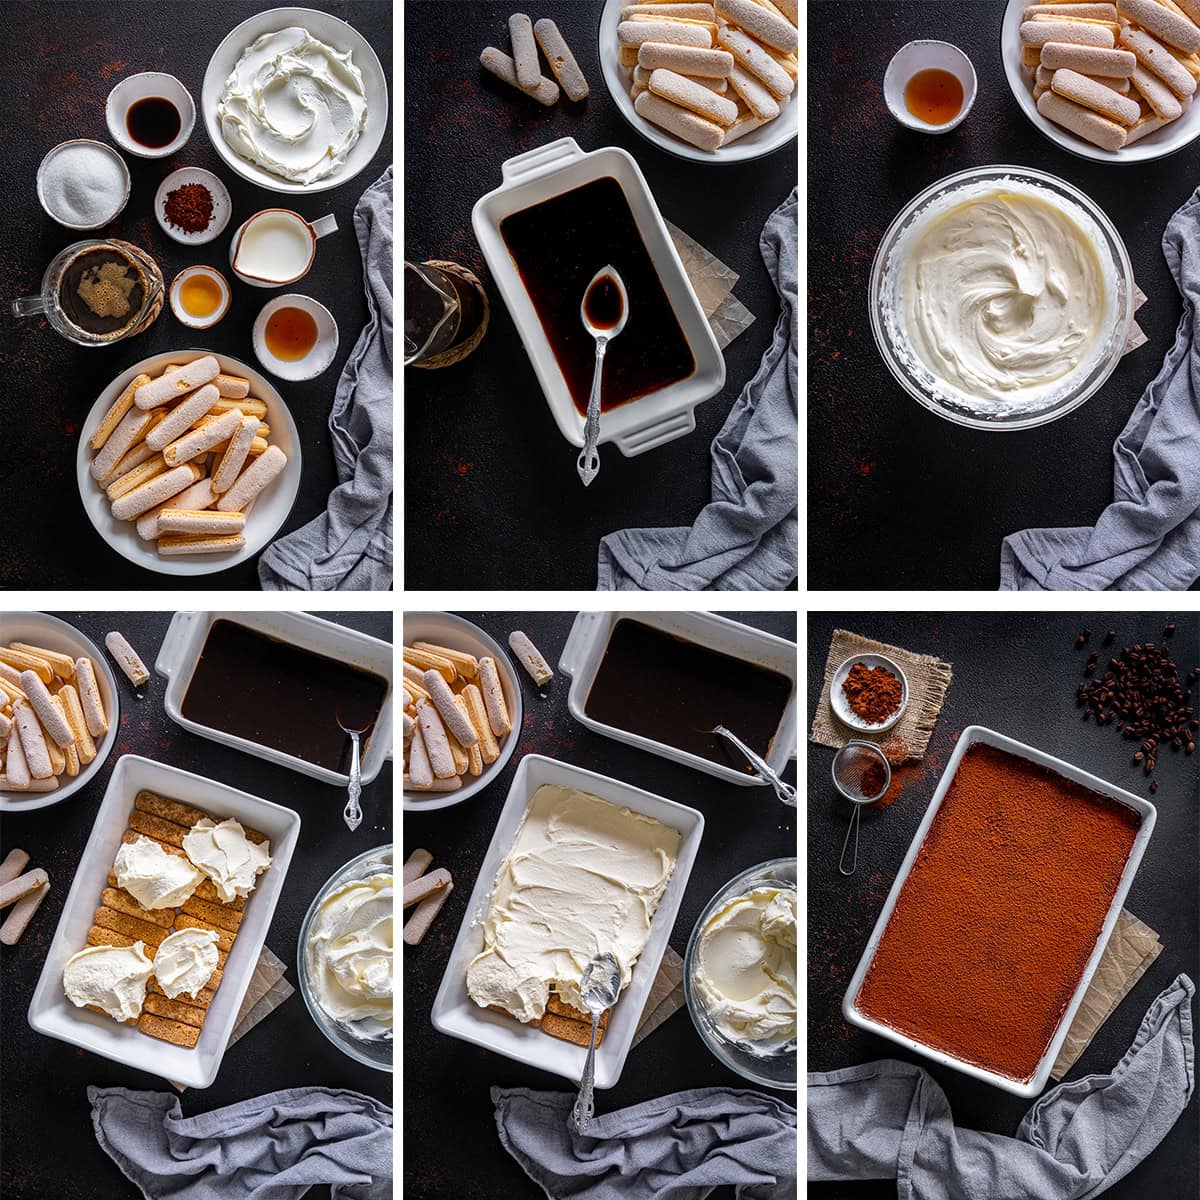
How to make Tiramisù the easy peasy way
This tiramisù really is so easy to make – and takes just 15 minutes to assemble!
All you need to do is quickly whip together mascarpone, double cream, vanilla, sugar and brandy.
Next, soak sponge fingers in a mixture of coffee and Kahlua (or more brandy), and place half the sponge fingers onto the base of the dish you are assembling your tiramisù in, to make a single layer.
Top the sponge fingers with half the mascarpone topping. And then repeat with another layer of coffee soaked sponge fingers and another layer of mascarpone topping.
Smooth the mascarpone layer nice and flat, then dust the top with cocoa powder, using a sieve.
Finally, refrigerate for at least 1 hour and up to 24 hours. (Which means it’s a great make-ahead dessert!)
(Full recipe given in the recipe card below.)
What to serve with Tiramisù
Tiramisù is a delicious dessert all by itself, so there is no need for any accompaniment.
However, if you wanted to, you could serve it with some fresh fruit, such as raspberries or strawberries, on the side.

What to drink with Tiramisù
Tiramisù should definitely be paired with a sweet dessert wine. Good options include Vin Santo from Tuscany, Passito di Pantelleria from Sicily, Rivesaltes or Banyuls from southern France, or a demi sec Chamapagne.
If none of those are possible (I realise they are all quite hard to get hold of, and some are quite expensive!), other options include sweet styles of Sherry, Tawny Port, Madeira or Moscato d’Asti.
And, of course, Tiramisù is delicious with a cup of coffee too!

Can you make Tiramisù ahead of time?
Absolutely – Tiramisù is a great ‘make ahead’ dessert as it actually improves over time. You can make this dessert up to 24 hours in advance. Simply assemble, as per the recipe card below, then cover with clingfilm and place in the fridge for up to 24 hours.

What to do with leftover Tiramisù
Tiramisù is at its best up to 24 hours after it has been made, however it will keep for up to 3 days after it is first made. Simply cover the leftovers with clingfilm (or transfer to a lidded container) and place in the fridge until needed.

Can you freeze Tiramisù?
No, tiramisù does not freeze well.

If you like this recipe…
…you might also like:

Easy Peasy Tiramisù
Equipment
- 1 small jug
- 1 shallow roasting tin
- 1 electric whisk
- 1 presentation dish, 28cm x 23cm / 11inch x 9inch (This is the dish in which you will assemble the tiramisù)
- 1 Sieve
Ingredients
Base
- 500 ml strong coffee 3 tablespoons instant coffee granules + 500ml / 2 cups boiling water
- 2 tablespoons Kahlua (or brandy)
- 400 g sponge fingers (AKA lady fingers, savoiardi or boudoir biscuits)
Topping
- 500 g mascarpone
- 600 ml double cream
- 1 teaspoon vanilla extract
- 8 tablespoons caster sugar
- 2 tablespoons brandy
Plus
- Cocoa powder for dusting
Instructions
Coffee
- Make the coffee in a small jug (or a very large mug), then pour it into a large shallow roasting tin (or similar). Add the Kahlua (or brandy) and mix together. Leave to cool while you make the topping. (See Note 1.)
Topping
- Place all the topping ingredients, except the brandy, in a large bowl and whisk with an electric whisk until soft peaks form. Do not over whisk!
- Gently stir in the brandy.
Base/Assembly
- Dip each sponge finger into the coffee mixture for about 10 seconds on each side.
- Place half the sponge fingers onto the base of the dish you are assembling your tiramisù in, to make a single layer. (The dish should be 28cm x 23cm / 11inch x 9inch)
- Top this layer of sponge fingers with half the cream mixture. Spread the topping mixture all across the sponge fingers and smooth to create a flat top. (See Note 2.)
- Top this layer of cream mixture with a second layer of coffee-soaked sponge fingers.
- Top the second layer of sponge fingers with a second layer of cream mixture. Spread the cream mixture all across the sponge fingers and smooth to create a flat top.
- Finally, dust the top with cocoa powder, using a sieve.
- Cover with cling film and refrigerate for a minimum of 1 hour, and up to 24 hours.
Notes
- The coffee does not have to be completely cold before you start soaking the sponge fingers, but it does need to be cool enough to handle without burning your fingers! By tipping it out into a large shallow roasting tin (or similar) it will cool down very quickly. By the time you’ve made the topping it should be plenty cool enough.
- I’ve tried a variety of methods for this and I find an ordinary table knife works best for spreading and smoothing the topping – so much better than trying to use a spoon!
- Not suitable for freezing.
- Nutrition information is approximate and meant as a guideline only.
Pin Easy Peasy Tiramisù for later

FREE 4 Week Easy Dinners Meal Plan
Have you got your hands on a copy of my meal plan yet? If not CLICK HERE to download a copy of my FREE 4 Week Easy Dinners Meal Plan today!
Dave says
Ever since my return from a trip to Italy, I have been obsessed with Tiamisu – this looks rather easy to make – a lovely little project for me and the kids at the weekend.
Eb Gargano says
Yay! That’s so great to hear 😀 Let us know how you get on!
Sonia Perry says
This is absolutely delicious – thank you!
And super easy to make which is even more impressive… 😊👍
Have to say though that I find the lady fingers, savoiardi or boudoir biscuits a bit too sweet, so I use slices of Madeira cake (a plain sponge cake) instead, which works just as well, although you have to be careful the slices don’t disintegrate after soaking…!
Everyone should try this delicious dessert at least just once… ! 😋
Eb Gargano says
Aw – yay, that’s so great to hear! Thank you for this lovely review 😀
Gwyn says
I am looking fwd to trying this recipe
Is there anything I can sub for cream please… my
partner is lactose intolerant,
gwyn
Eb Gargano says
Great to hear you are looking forward to trying this recipe. As a sub for regular cream, you could try lactose free whipping cream or vegan whipping cream (I know Arla do a lactose free whipping cream and Elmlea and Flora do vegan whipping cream, if you are in the UK). But the bigger problem is the mascarpone, which also contains lactose. I believe it is possible to get vegan mascarpone, but I don’t know if it’s any good. You also could try lactose free cream cheese as a sub. I know both Arla and Philadelphia do a lactose free cream cheese. I have never tried making this lactose free, so I have no idea how well it will work, but it’s definitely worth experimenting! Let us know how you get on 😀
Tanveer Salt says
This is calling my name. Do you dip the ladyfingers quickly or let them soak longer for extra coffee flavor? Also any favorite twists, like adding a berry layer or chocolate shavings? Always looking to level up my tiramisu game.
Eb Gargano says
I recommend dipping the ladyfingers for 10 seconds on each side – this for me is the perfect balance. If you dip them too long they tend to disintegrate, while if you don’t dip them long enough they’ll be too dry. You can add chocolate shavings in place of the cocoa if you prefer – both ways are delicious. I haven’t tried a berry layer, but that sounds delicious too!